Autonomous Agent
Learn how to use the Autonomous Agent node in YourGPT Studio to build a goal-driven AI agent that reasons, calls your APIs and code, and routes the conversation on its own.
The Autonomous Agent is an AI node that you give a goal to — then it figures out the rest at runtime. Instead of wiring every step by hand, you describe what the agent should do and give it a set of skills (APIs to call, code to run, knowledge to search). The agent reads the conversation, decides which skills to use and when, replies to the user, and can route the flow to a different node when a condition you defined is met.
Autonomous Agent vs. other AI nodes
A regular AI Response or AI Retrieval node runs one deterministic step and moves on. The Autonomous Agent is agentic — it runs a reasoning loop, can call multiple tools across several turns, and decides for itself when it's done or when to hand the conversation off.
| AI Response / Retrieval | Autonomous Agent | |
|---|---|---|
| Behavior | One fixed step | Multi-step reasoning loop |
| Tools | None | API skills, code skills, app integrations, browser actions, knowledge, web search |
| Routing | Always the next node | Can exit to different nodes based on conditions |
| Best for | Single, predictable replies | Open-ended tasks (support, lookups, multi-step help) |
Add the node to your flow
- Drop the node onto the canvas:
- In the Flow section of Chatbot Studio, open the AI group in the tools panel and drag Autonomous Agent onto the canvas. Connect it like any other node — an input handle on the left, an output handle on the right.
- Write the instructions:
- Click the node to open its panel and tell the agent what its job is. This is the only required field.
- Add skills:
- Use + Add Skill (or the Agent Skills panel that appears when the node is selected) to give the agent API endpoints, code functions, connected apps, browser actions, exit scenarios, and rich-message permissions.
Tip
The agent calls skills automatically during the conversation — you don't connect them as separate steps. Skills live inside the agent node; only Exit Scenarios create outgoing connections to other nodes.
Settings
The Settings tab controls the agent's core behavior.
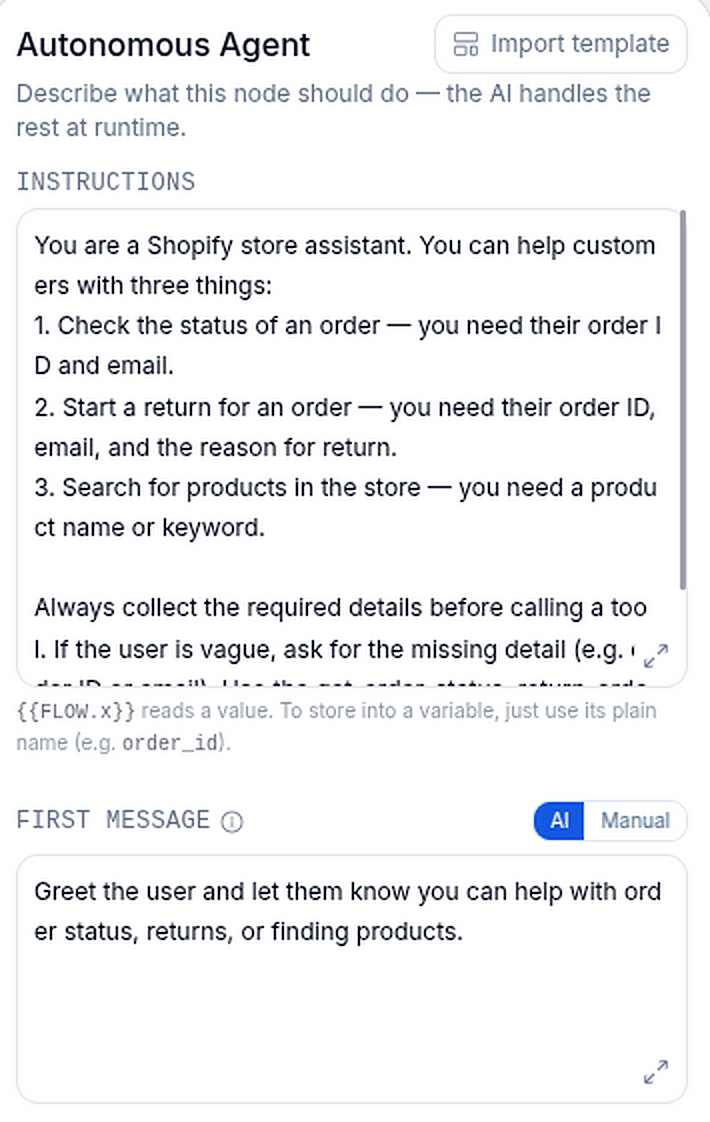
To start from a ready-made setup instead of a blank node, use Import template at the top of the panel — it loads a preconfigured agent (instructions and skills) that you can then customize.
Instructions (required)
Describe the agent's job in plain language — for example, "Help the user with their support question. Look up their order status if needed." This is the agent's primary directive.
You can use flow variables here:
- Read a variable with
{{FLOW.variableName}}. - Store into a variable by mentioning its plain name (e.g.
order_id) — the agent sets it when the value comes up in the conversation.
First message (optional)
Controls the agent's opening message. Switch between two modes:
- AI (default): the agent writes its own opener, guided by any text you provide (e.g. "greet and list what you can help with").
- Manual: you write the exact opening message (e.g. "Hi! 👋 How can I help?").
Tools
Built-in capabilities the agent can use. The agent decides when to use them.
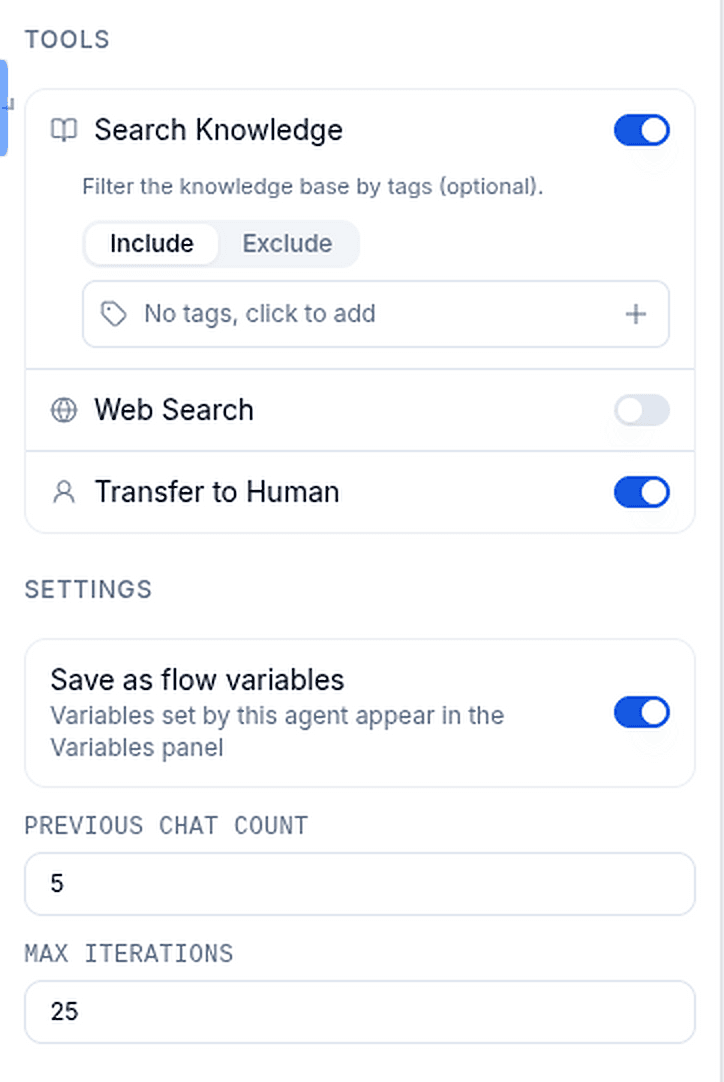
| Tool | Default | What it does |
|---|---|---|
| Search Knowledge | On | Search your knowledge base to answer questions |
| Web Search | Off | Search the internet for current information (billed as an add-on) |
| Transfer to Human | On | Escalate the conversation to a human agent |
When Search Knowledge is on, you can also add a tag filter to control which parts of your knowledge base the agent searches — pick one or more tags and set the filter to Include (only search sources with those tags) or Exclude (search everything except those tags).
Settings
| Setting | Default | Range | What it does |
|---|---|---|---|
| Save as flow variables | On | — | Variables the agent sets appear in the flow's Variables panel for use in later nodes |
| Previous Chat Count | 5 | 0–50 | How many earlier messages the agent sees for context (use 0 for none) |
| Max Iterations | 25 | 1–100 | Maximum agent replies allowed in a single conversation — prevents the agent from looping forever |
What Max Iterations counts
Max Iterations is a reply budget for the whole conversation, not a per-turn tool-call limit. Within a single turn the agent can still call several tools in a row as it reasons. Once the budget is reached, the agent wraps up and completes instead of continuing.
Model is automatic
The model, temperature, and token limits for the Autonomous Agent are managed automatically — there's nothing to configure. If the primary model is unavailable, the system falls back to a backup model so the agent keeps working.
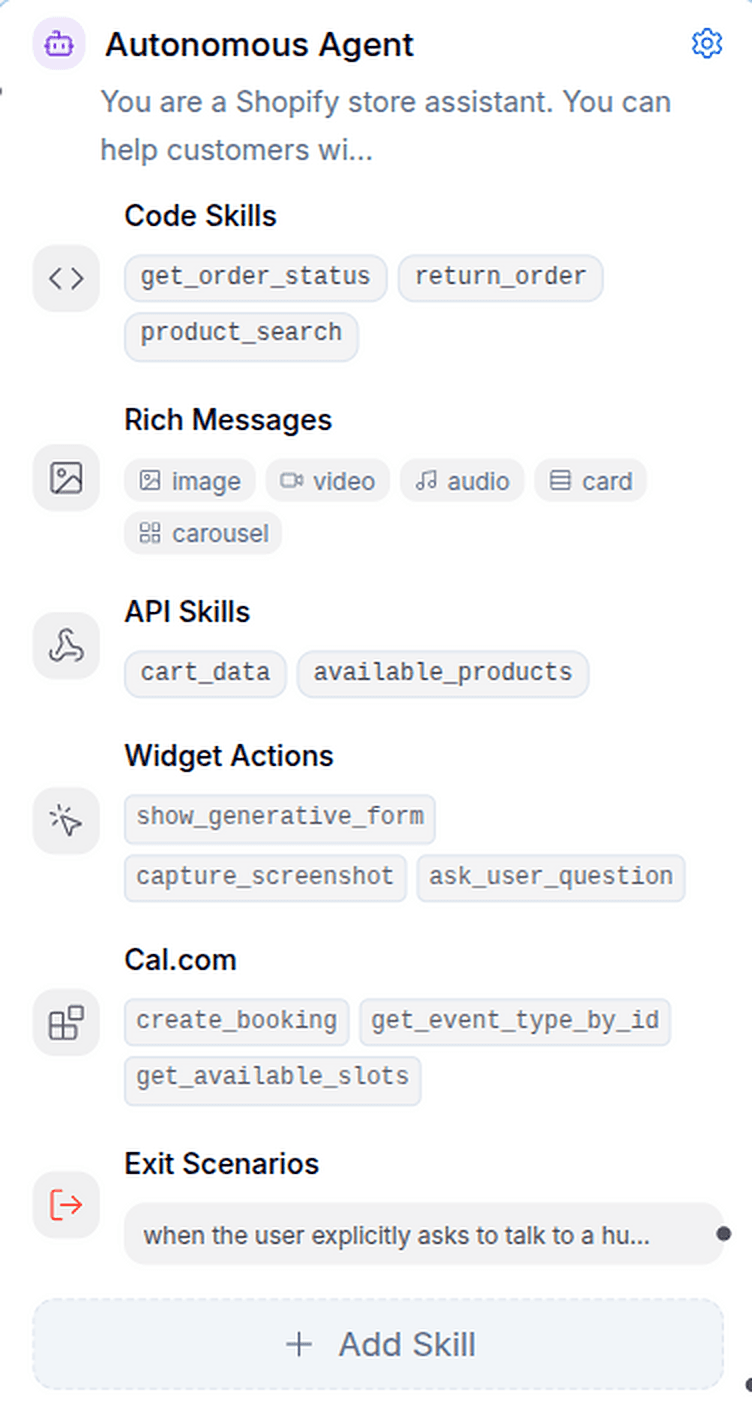
Skills
Skills are the tools you give the agent. They're configured inside the node and called automatically based on the conversation. There are six skill types.
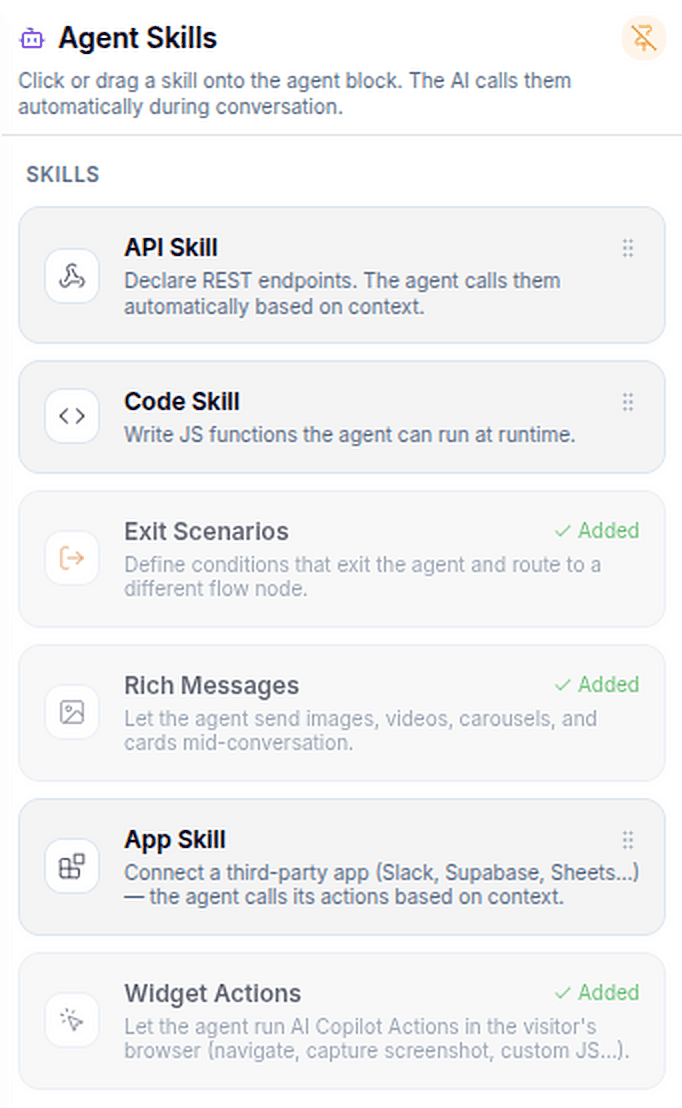
| Skill | Multiple allowed? | Purpose |
|---|---|---|
| API Skill | Yes | Call REST endpoints to fetch or update external data |
| Code Skill | Yes | Run custom JavaScript or Python logic |
| App Skill | Yes | Let the agent act in a connected third-party app (Slack, Google Sheets, Supabase, and more) |
| Widget Actions | One per agent | Let the agent run Copilot actions in the visitor's browser |
| Exit Scenarios | One per agent | Define conditions that exit the agent and route to another node |
| Rich Messages | One per agent | Control which media types the agent may send |
Note
Every function across all skills shares one tool namespace, so tool names must be unique within the agent. The builder warns you about duplicates. Use clear snake_case names like search_products or get_order_status.
API Skills
Declare REST endpoints the agent can call. Add a Skill label (e.g. "Product APIs") to group them, then add one or more endpoints.
For each endpoint:
- Tool name — the unique identifier the agent uses (no spaces).
- Description — explains what it does and when to call it. The agent reads this to decide whether to use the endpoint, so be specific (e.g. "Search products by keyword. Use when the user asks about products.").
- Endpoint — the HTTP method (GET, POST, PUT, DELETE, PATCH) and the URL.
- Headers — static values like API keys or auth tokens. These are set at build time, not from the conversation.
- AI Parameters — slots the agent fills from the conversation at runtime. Give each a name, a description (e.g. a
queryparameter described as "search keyword"), and a data type (string, number, integer, boolean, array, or object) so the value is passed to your endpoint in the right shape. - Request Parameters — fixed values you set at build time that the agent never sees or changes. Use these for constants like an account ID or a fixed filter. You can enter them as key–value pairs or switch to Raw JSON to supply a full request body.
You can reference flow and config variables inside URLs, headers, and request parameters with {{FLOW.variableName}} and {{CONFIG.variableName}}.
You can also use Import cURL to paste a curl command — the URL, method, and headers are imported as-is, and the body/query fields become parameters the agent fills.
Use the Test API button to run the endpoint with sample parameter values and inspect the response before going live.

Code Skills
Write functions the agent can run — useful for calculations, formatting, or conditional logic. Choose JavaScript or Python with the language selector, add a Skill label (e.g. "Calculation Tools"), then add one or more functions.
For each function:
- Function name — the unique identifier the agent uses (no spaces).
- Description — what it does and when to call it.
- Parameters — inputs the agent provides, available as
params. - Code — your logic. Whatever you return is sent back to the agent as the tool result.
// JavaScript: access params as params.name, then return a value
return params.n * 2;
# Python: access params as params["name"], and return from main()
def main():
return int(params["n"]) * 2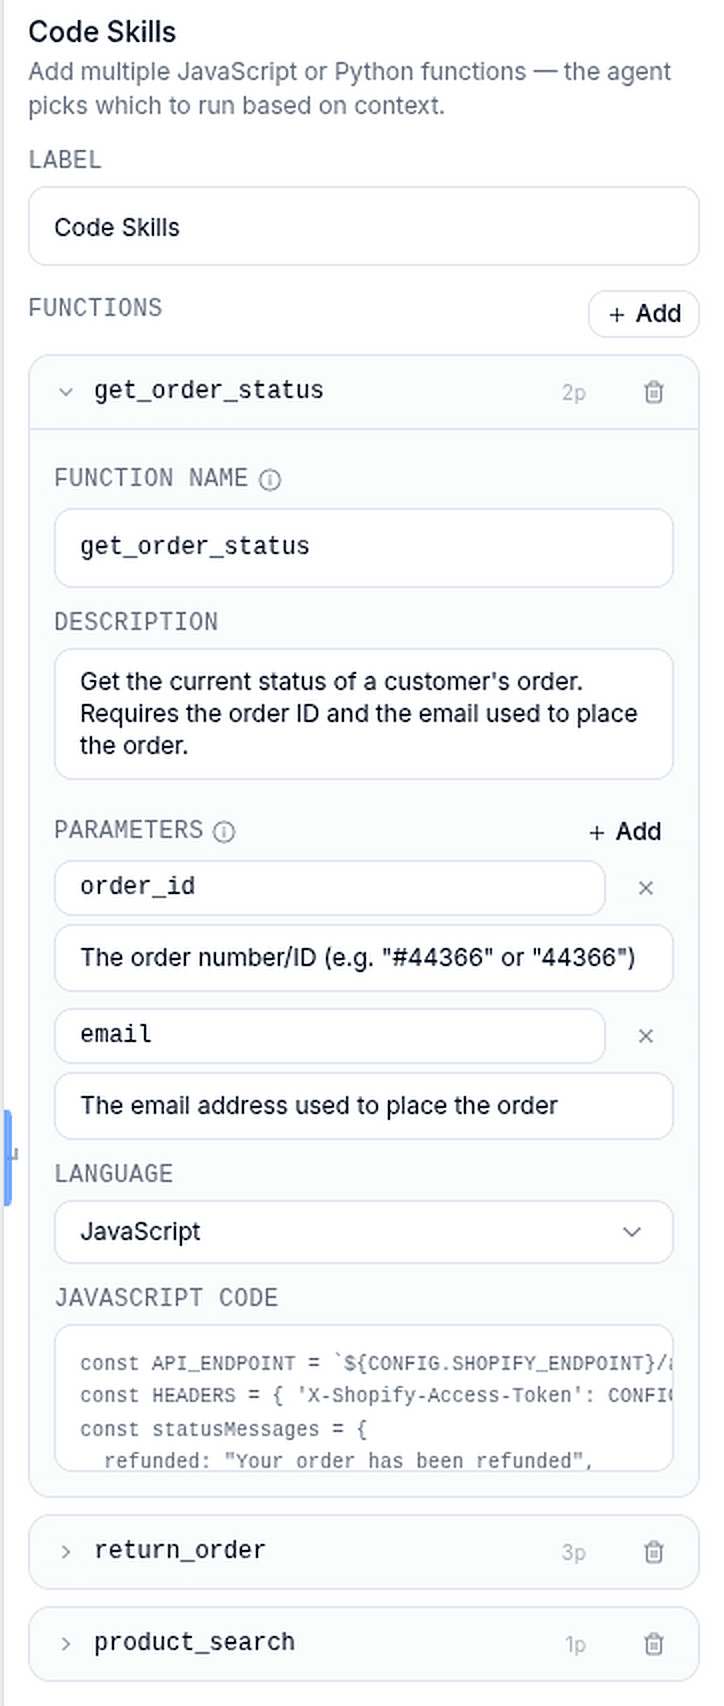
App Skills
App Skills let the agent take actions in a connected third-party app — such as posting to Slack, appending a row to Google Sheets, or reading and writing records in Supabase.
To set one up:
- Choose an app and select a connection (an account you've already authorized in YourGPT). If you haven't connected the app yet, add the connection first, then return to the skill.
- Enable the actions you want the agent to use. Each enabled action becomes a tool the agent can call.
- Description (optional) — override the default description for an action to steer when the agent uses it.
- Presets (optional) — fix certain fields to a fixed value that the agent can't change and never sees (for example, always post to a specific Slack channel). The agent only fills the remaining fields from the conversation.

Widget Actions
Widget Actions let the agent trigger AI Copilot actions that run in the visitor's browser — for example, navigating the page, filling a form, or calling a function your site exposes to the widget. This skill is only relevant on the web widget channel.
- Pick from the project's registered widget actions (built-in actions plus any custom actions your site registers with the widget).
- Description (optional) — override an action's description to guide when the agent runs it.
When the agent calls a widget action, it hands the request to the visitor's browser and waits for the result before continuing — you'll see progress updates in the conversation while the action runs.
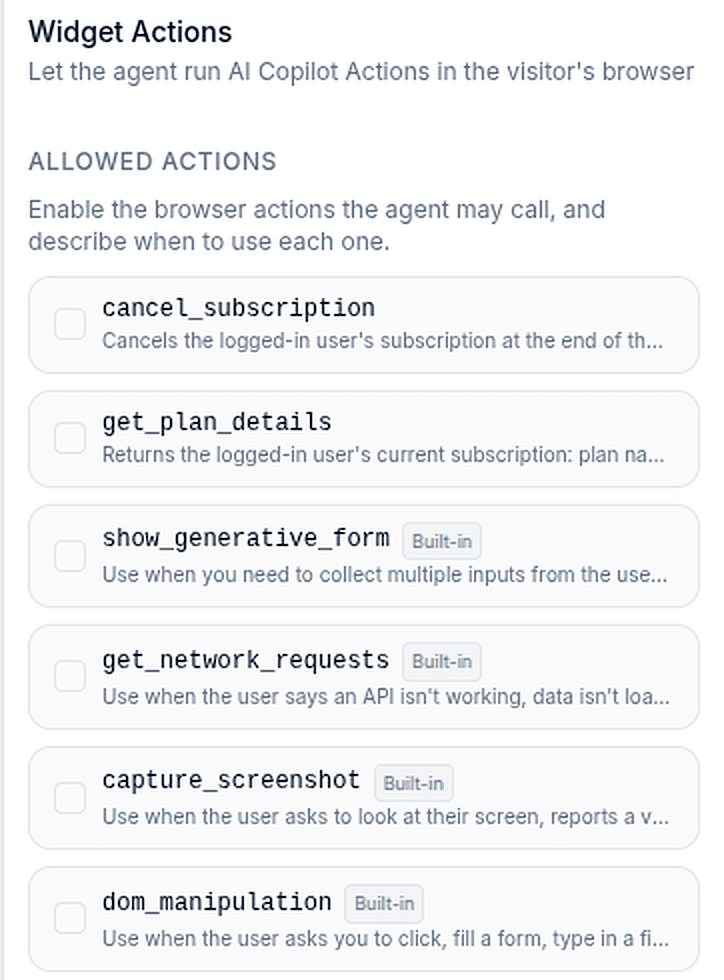
Requires widget registration
A widget action only appears to the agent if the running widget has registered it. Actions that aren't registered on the live page are skipped.
Exit Scenarios
Exit Scenarios let the agent stop and route the conversation to a different node when a condition is met. There's one Exit Scenarios skill per agent, and it can hold several scenarios.
For each scenario:
- Condition — a plain-language description of when the agent should exit (e.g. "User wants a refund" or "User explicitly asks to speak to a human"). The agent evaluates this on every turn.
- Exit reply (optional) — a message the agent sends just before it exits (e.g. "Let me connect you with the right team…").
- Routing handle — each scenario gets its own output handle on the node. Wire it to wherever that path should go, such as a human-handoff or refund flow.
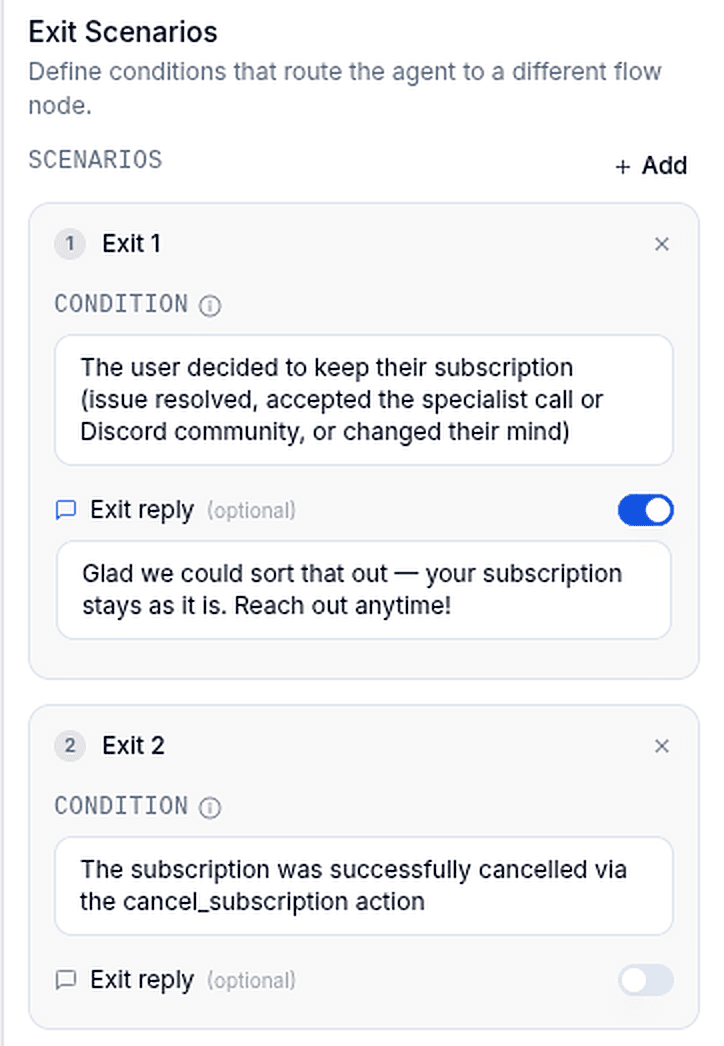
Tip
Write conditions that are unambiguous. "User explicitly requested a human agent" routes more reliably than a vague "agent is unsure".
Rich Messages
Control which media types the agent is allowed to send mid-conversation. There's one Rich Messages skill per agent, and all types are on by default.
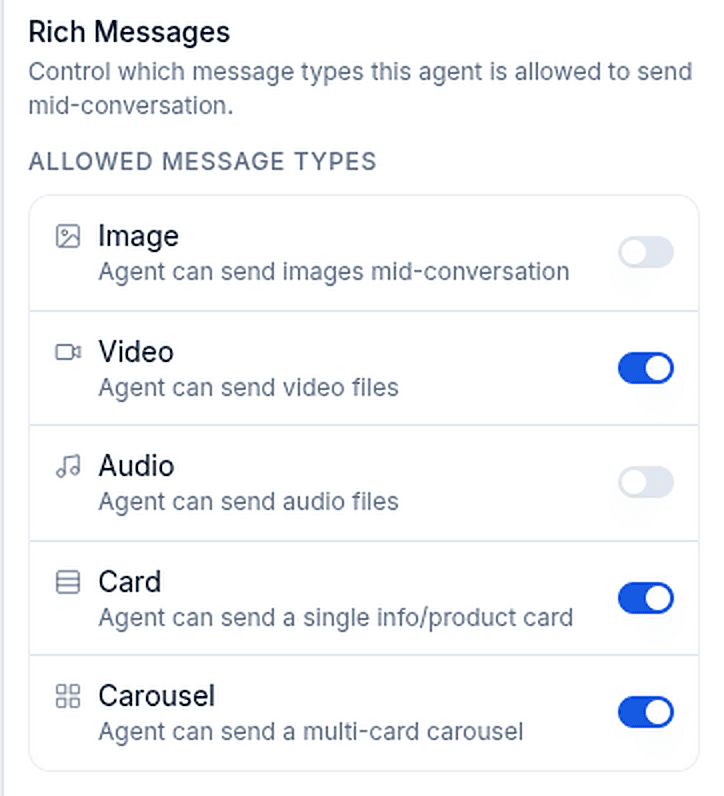
| Type | What it allows |
|---|---|
| Image | Send images |
| Video | Send video files |
| Audio | Send audio files |
| Card | Send a single info/product card |
| Carousel | Send a multi-card carousel |
Channel support
Available rich-message types depend on the channel the conversation is on. If a channel can't deliver a format, the agent simply won't offer it — so it never picks a format that would degrade. For example: voice (Twilio Call) supports audio only; WhatsApp supports images, audio, video, and cards but not carousels; SMS is text only; Discord, Slack, Intercom, and Email have limited support (no carousel). The web widget and most messaging channels support all types.
How the agent runs
When the flow reaches the node, the agent:
- Reads your instructions and the last Previous Chat Count messages for context.
- Decides whether it can answer directly or needs a tool. If it needs one, it fills in the parameters from the conversation and calls the matching skill (API, code, app, or browser action).
- Reviews the result and loops again — calling more tools or replying to the user — until the task is handled or it reaches the Max Iterations reply budget for the conversation.
- Checks your exit conditions each turn. If one matches, it sends the optional exit reply and routes the flow to that scenario's connected node.
- Otherwise, when it's done it continues to the node connected to the agent's normal output.
Any variables the agent collects are saved to the flow (when Save as flow variables is on) and can be used downstream with {{FLOW.variableName}}.
Use cases
- Customer support — answer questions from your knowledge base, look up orders via an API, and hand off to a human on a refund request.
- Lead qualification — ask questions, store answers as flow variables, and branch based on the outcome.
- Multi-step lookups — chain several API calls (e.g. find a customer, then fetch their subscription) without wiring each step by hand.
- Calculations & formatting — run code skills (JavaScript or Python) to compute totals, validate input, or transform data mid-conversation.
- Act in your tools — use app skills to post a Slack update, log a row in Google Sheets, or update a Supabase record as part of the conversation.
- Guided in-page actions — use widget actions to navigate the site or fill a form for the visitor directly in the web widget.
Best practices
Be specific in instructions
Tell the agent its role, the tasks to handle, and what tools it has — e.g. "You are a support agent. Look up orders by ID and check delivery status. Escalate refund requests to a human."
Write tool descriptions for the agent, not for you
The agent chooses tools based on their descriptions. State clearly when each one should be used so it calls the right tool at the right time.
Keep Max Iterations reasonable
Most tasks finish in a handful of tool calls. A high limit allows more complex chains but can increase response time and cost.