Functions
Functions are autonomous tools for specific tasks, guided by your base prompt.
graph LR
  A([Start]) --> B[User Query]
  B --> C[AI Receives Query]
  C --> D{Check Prompt & Functions}
  D -->|No Function| E[Direct Response]
  D -->|Need Function| F[Function Handling]


  subgraph Function Calls
  F -.-> G[Function 1]
  F -.-> H[Function 2]
  F -.-> I[Function 3]
  F -.-> J[Function N]
  end

  G & H & I & J -.-> K[Collect Results]
  K --> L[Generate Response]
  E --> L
  L --> M[Send to User]
  M --> N([End])

  %% Layout adjustments
  A --- C
  J --- N

  classDef default fill:#f0f4f8,stroke:#506480,stroke-width:2px;
  classDef process fill:#d0e3ff,stroke:#3474eb,stroke-width:2px;
  classDef decision fill:#ffeeba,stroke:#d39e00,stroke-width:2px;
  classDef start_end fill:#d4edda,stroke:#28a745,stroke-width:2px;
  classDef function fill:#e8d8ff,stroke:#6f42c1,stroke-width:2px;

  class A,N start_end;
  class B,C,E,K,L,M process;
  class D decision;
  class F,G,H,I,J function;
Functions act as tools or micro-agents that perform specific tasks. They are autonomous and can be guided using your base prompt.
Benefits
-
Chained Execution: AI can execute a chain of functions to answer complex queries. For example, for the query "weather of India & current time," the AI would first call a function to get the weather in India and then another function to get the current time in India.
-
Easy Setup: Functions are simple to set up. You only need to enable the function and, if needed, guide when the function should execute by defining it in your base prompt settings. For example, "Use Websearch function to answer any stock price-related questions and do not use web search for any other purpose."
Cons
-
Sequence Limitations: Long sequences that require input across multiple messages may not work effectively.
-
Customization Constraints: There are limitations on how much you can customize the functions.
Getting Started
Navigate to Functions
From your YourGPT dashboard, navigate to Automation > Functions in the left sidebar. You'll see four types of functions available:
- System Functions - Pre-built system function templates
- Code Functions - Custom code execution functions
- API Functions - External API integrations
- MCP Servers - Model Context Protocol servers to enable your YourGPT AI Agent to call external tools and services.
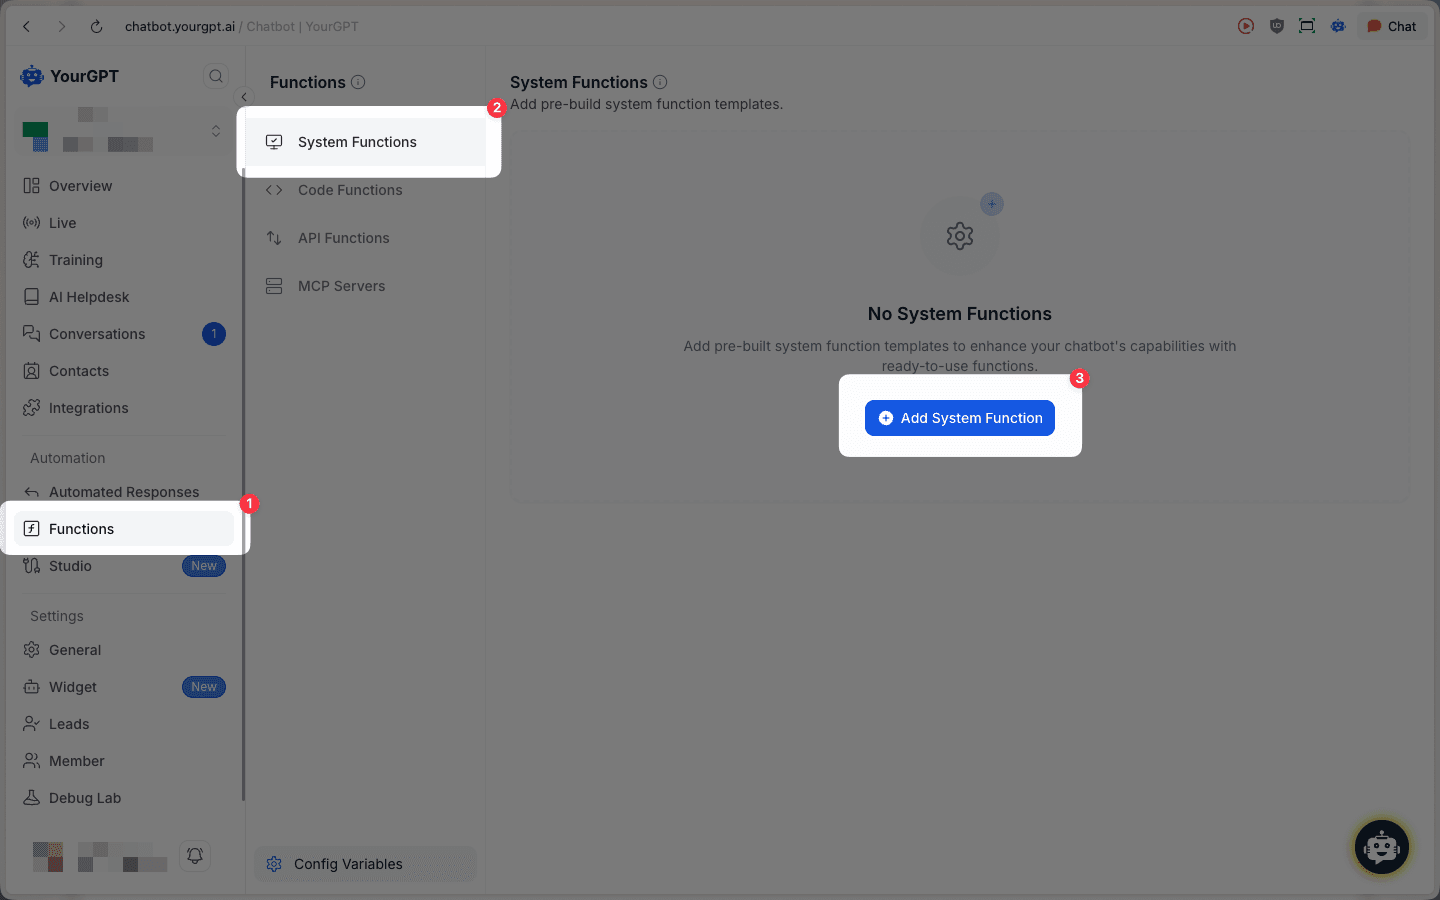
System Functions
Select System Functions from the dropdown menu to access pre-built function templates. Click the Add System Function button to enable:
- Web Search: This function performs web searches to fetch real-time information from the web, such as the latest news, weather updates, or stock prices.
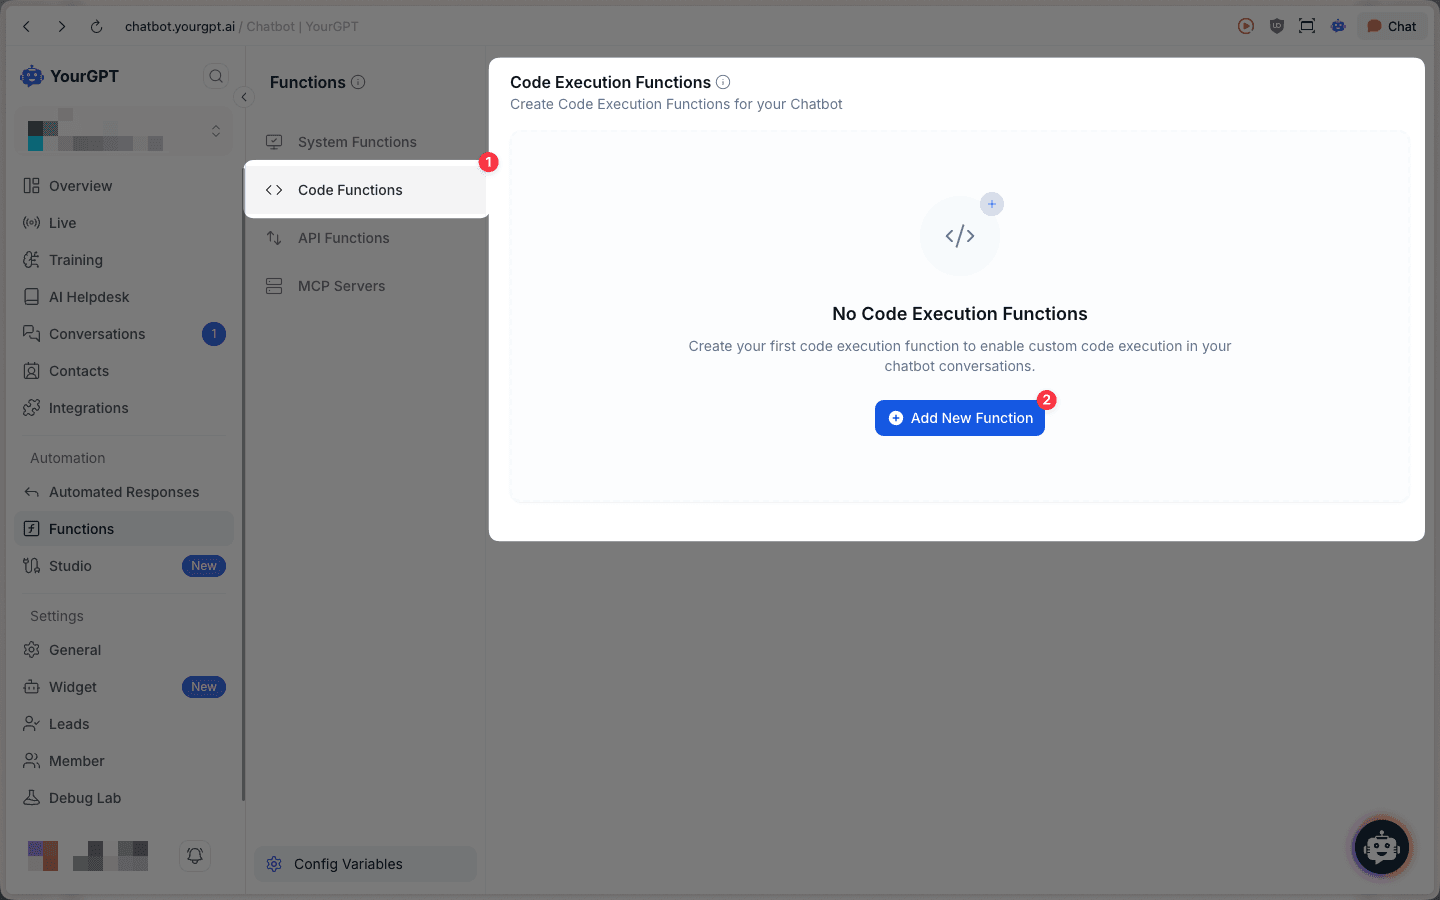
Code Functions
Code Functions allow you to create custom code execution functions using JavaScript or Python. These functions enable your AI to perform complex operations, data processing, or integrate with services through code.
Navigate to Code Functions
Select Code Functions from the dropdown menu and click the Add New Function button.
Configure Function Details
Fill in the basic information for your code function:
- Name: Enter a function name using only lowercase letters, numbers, underscores, and hyphens (e.g.,
create_post,update_todo) - Description: Provide a clear description of what the function does
- Language: Select either JavaScript or Python
- Code: Write your custom code in the syntax-highlighted editor
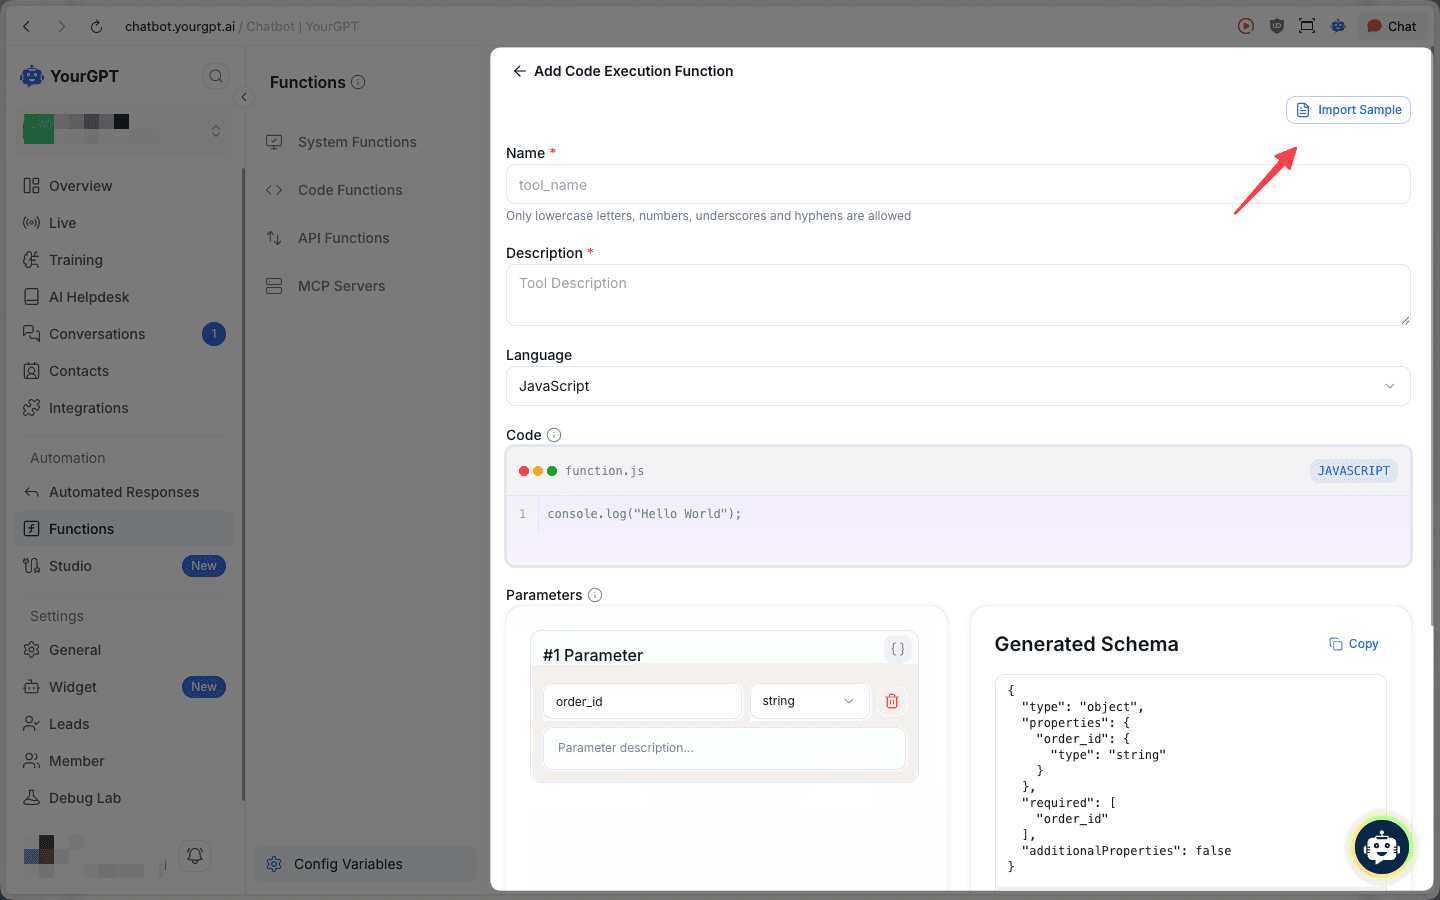
Define Parameters
Add parameters that your function needs to execute:
- Click Add Parameter to create a new parameter
- For each parameter, specify:
- Parameter name: The variable name (e.g.,
title,body,post_id) - Type: Select from string, number, boolean, etc.
- Description: Explain what this parameter is for
- Parameter name: The variable name (e.g.,
The Generated Schema panel on the right automatically updates as you add parameters, showing the JSON schema in real-time.
Accessing Parameters in Code
Inside your code block, access the values the AI extracts from the user's message using TOOL_PARAMS.parameter_name (no curly braces — this is a JavaScript/Python variable, not a template placeholder):
const postId = TOOL_PARAMS.post_id;
const title = TOOL_PARAMS.title;

const url = `https://jsonplaceholder.typicode.com/posts/${postId}`;
const response = await fetch(url);
return await response.json();
Code Functions vs API Functions syntax:
- Code Functions (JS/Python editor):
TOOL_PARAMS.variable— plain variable access in code - API Functions (URL / Raw JSON / Headers fields):
{{TOOL_PARAMS.variable}}— template placeholder substituted before the request is sent
Tip: You can edit the JSON schema directly and click "Apply Changes" to update the parameter builder. Parameters use JSON Schema format for validation and are always required in strict mode.
Import Sample Code (Optional)
Click the Import Sample button to load pre-built examples:
- Create Blog Posts: HTTP POST request to create blog posts with title and body parameters
- Update Todo Items: PATCH request to update todo items with dynamic URLs and status management
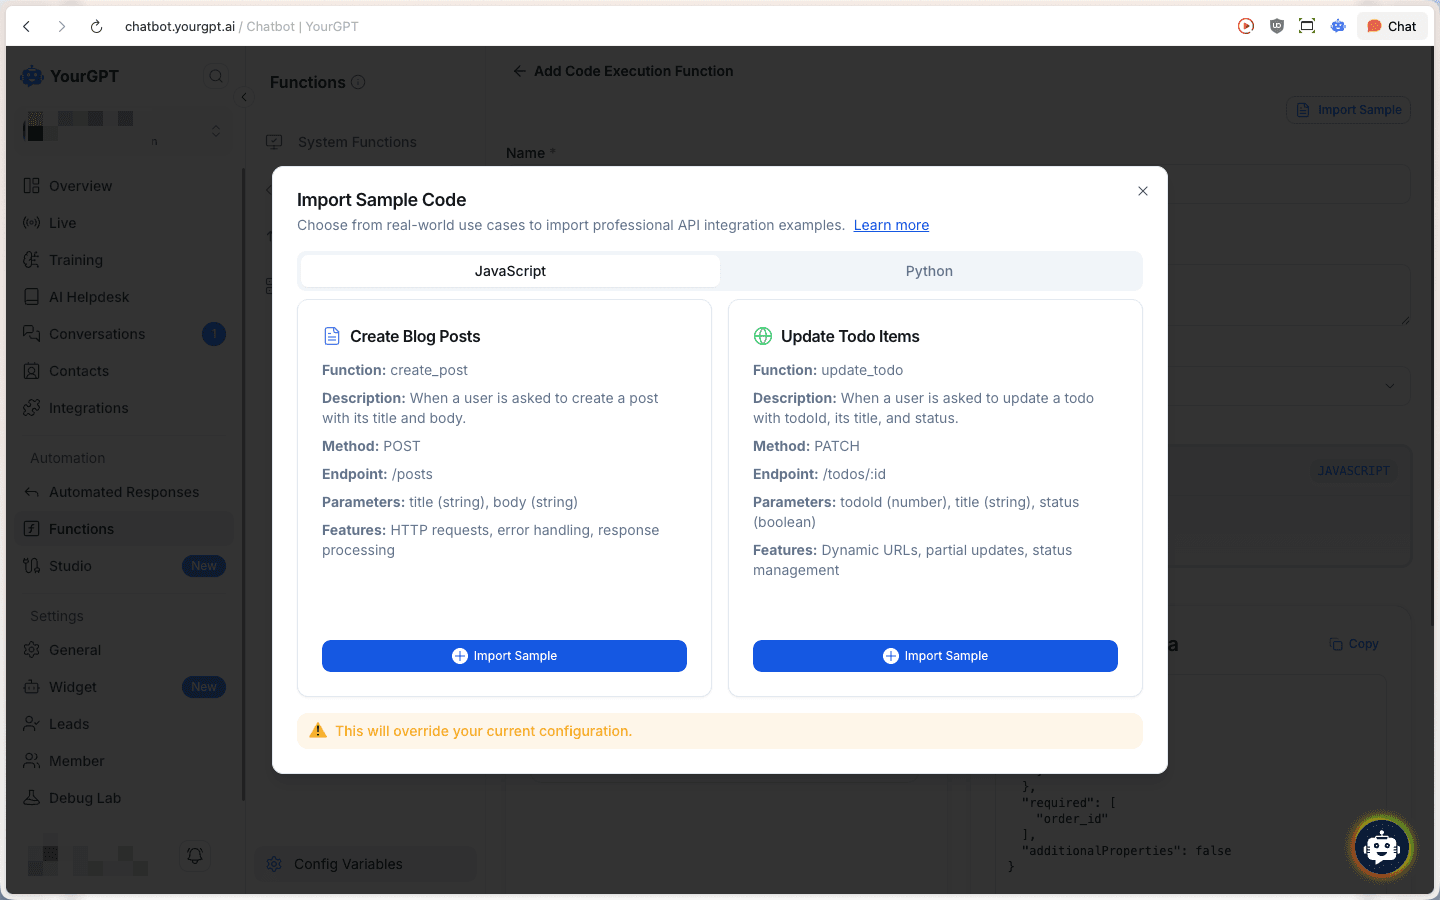
Importing a sample will override your current configuration.
Review and Save
Review your function configuration, including all parameters and the generated schema. The code editor shows your complete function with line numbers and syntax highlighting.
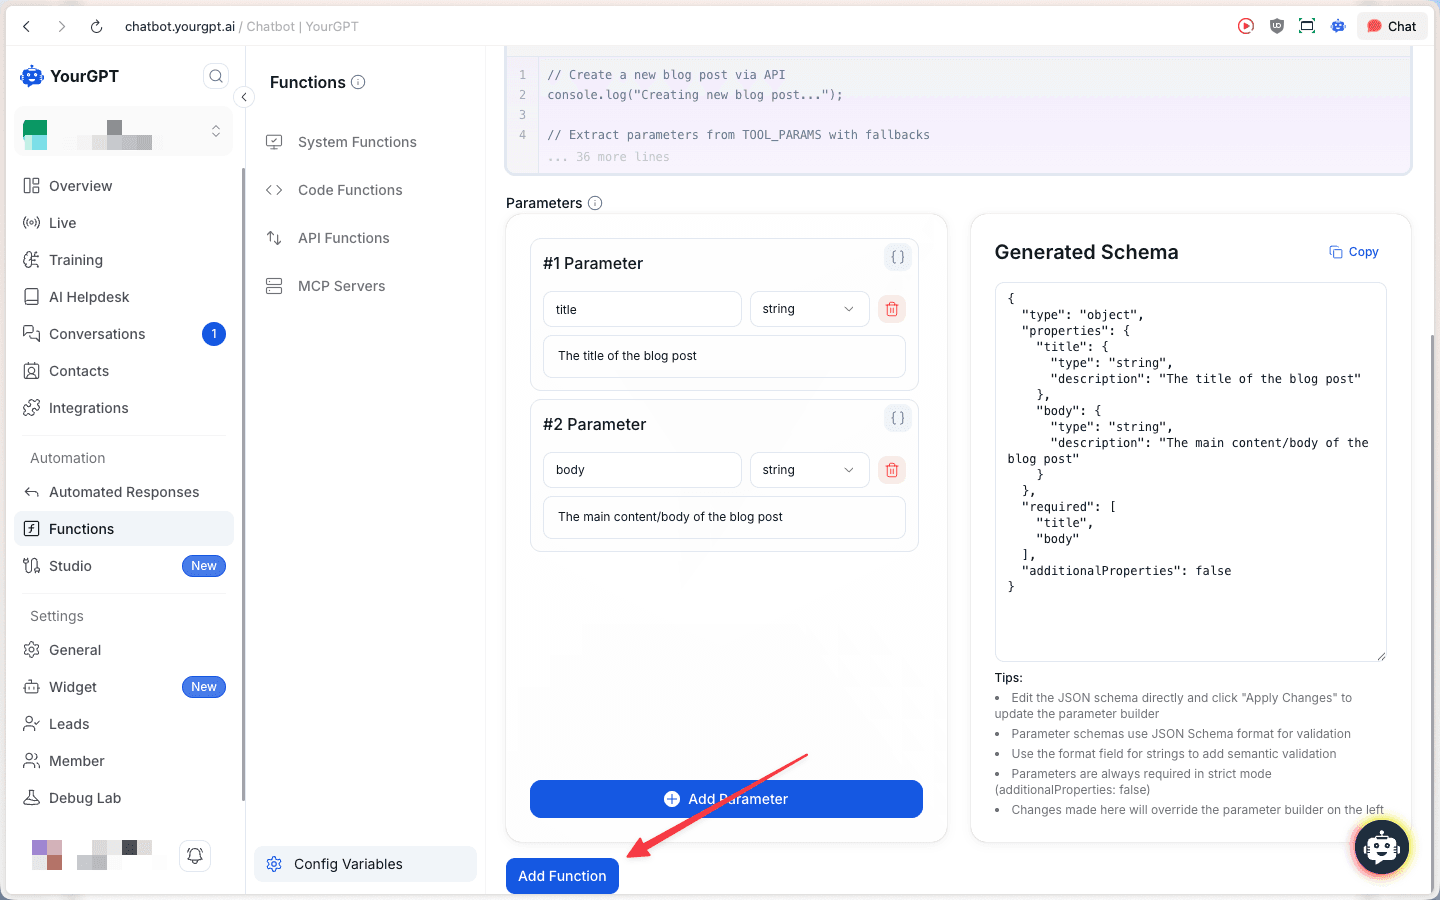
Click Add Function to save your code function.
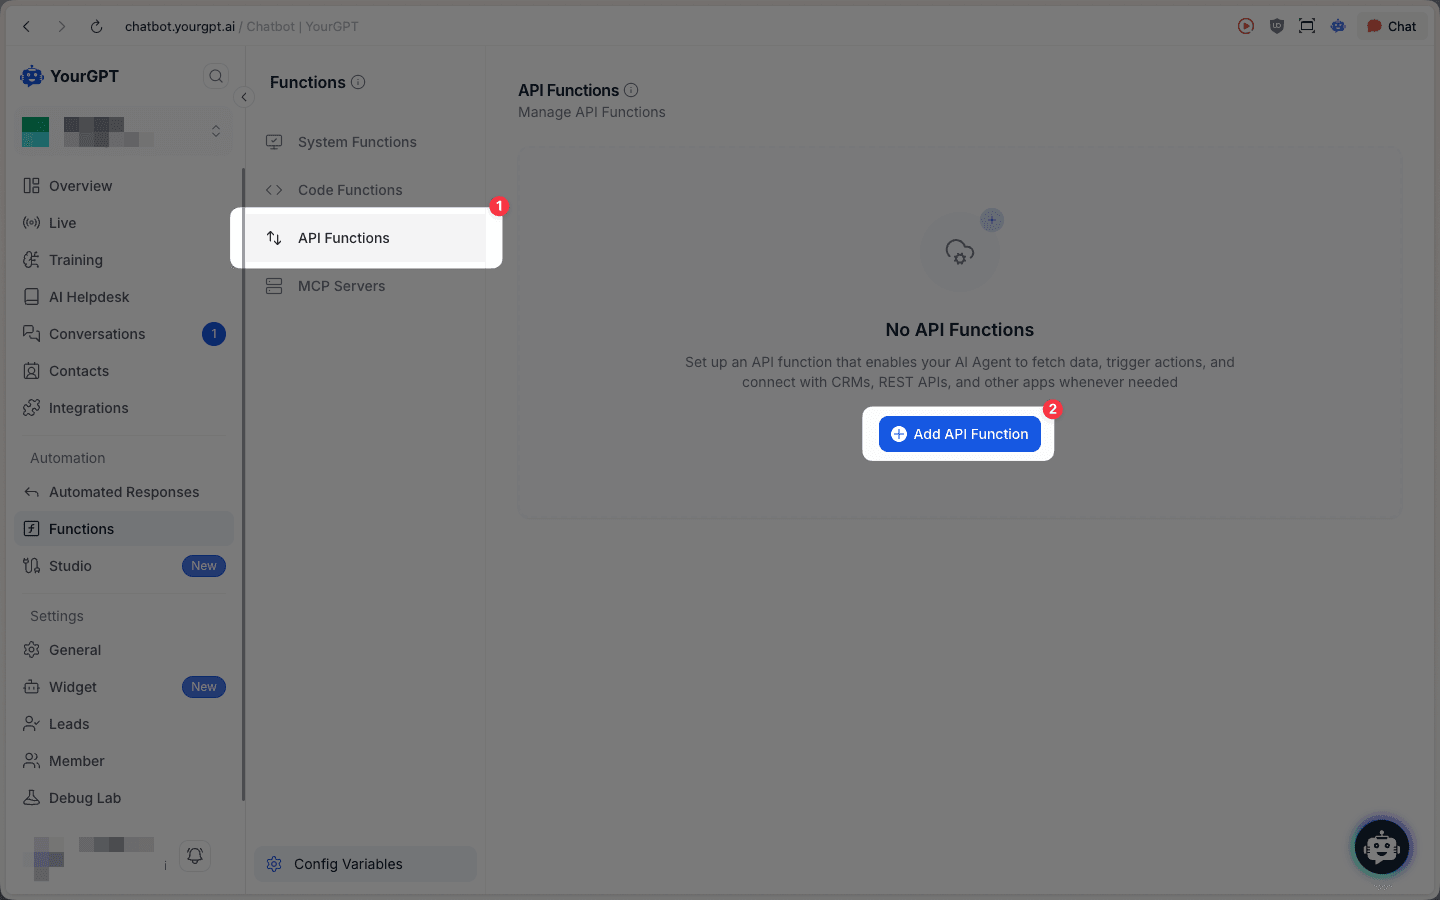
API Functions
API Functions allow you to connect your AI to external APIs and integrate their data or services into your chatbot responses. You can call any REST API and define how your AI should interact with it.
Navigate to API Functions
Select API Functions from the dropdown menu and click the Add API Function button.
Configure API Details
Fill in the basic information for your API function:
- Name: Enter a descriptive name for your API function
- Description: Provide a brief explanation of what the function does
- API Endpoint:
- Select the HTTP method (GET, POST, PATCH, PUT, DELETE, etc.)
- Enter the endpoint URL for the API you want to call
- Click Test API to verify the endpoint works
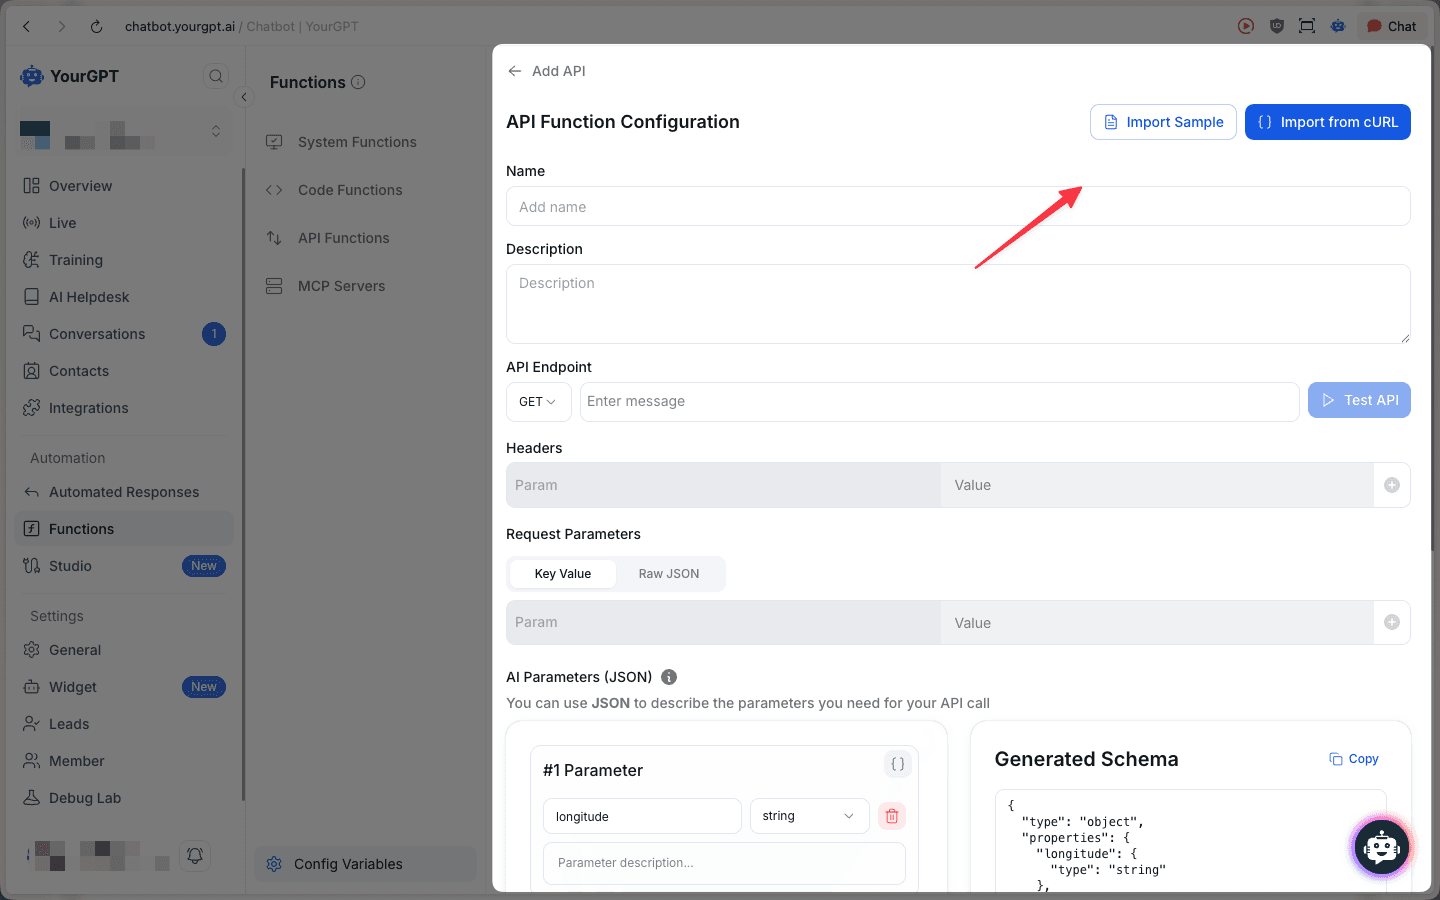
Add Headers and Request Parameters
- Headers: Add required headers (e.g.,
Authorization,Content-Type) using the + button. - Request Parameters: Use the Key Value tab for simple pairs or Raw JSON tab for structured body data.
- Key Value:
city→{{TOOL_PARAMS.city}} - Raw JSON:
{"city": "{{TOOL_PARAMS.city}}", "unit": "metric"}
- Key Value:
- AI Parameters (JSON): Define what the AI should extract from the user — name, type, and description for each parameter. The Generated Schema panel updates automatically.
Using Parameters in Your Request
Use {{TOOL_PARAMS.parameter_name}} anywhere in your request — the AI fills in the value from the user's message at runtime.
| Location | Example |
|---|---|
| URL | https://api.example.com/products/{{TOOL_PARAMS.product_id}} |
| Raw JSON body | {"city": "{{TOOL_PARAMS.city}}"} |
| Headers | X-User-ID: {{TOOL_PARAMS.user_id}} |
Tip: You can edit the JSON schema directly and click "Apply Changes" to update the parameter builder.
Import Sample API (Optional)
Click the Import Sample button to load pre-configured API examples:
- Products API: GET request to fetch products with limit, skip, and select parameters
- Recipe API: Additional sample API configurations
Alternatively, use Import from cURL to convert cURL commands directly into function configuration.

Importing a sample will override your current configuration.
Review and Save
Review your complete API function configuration, including all parameters and the generated schema. Verify that:
- All required parameters are defined
- The API endpoint is correct
- Headers are properly configured
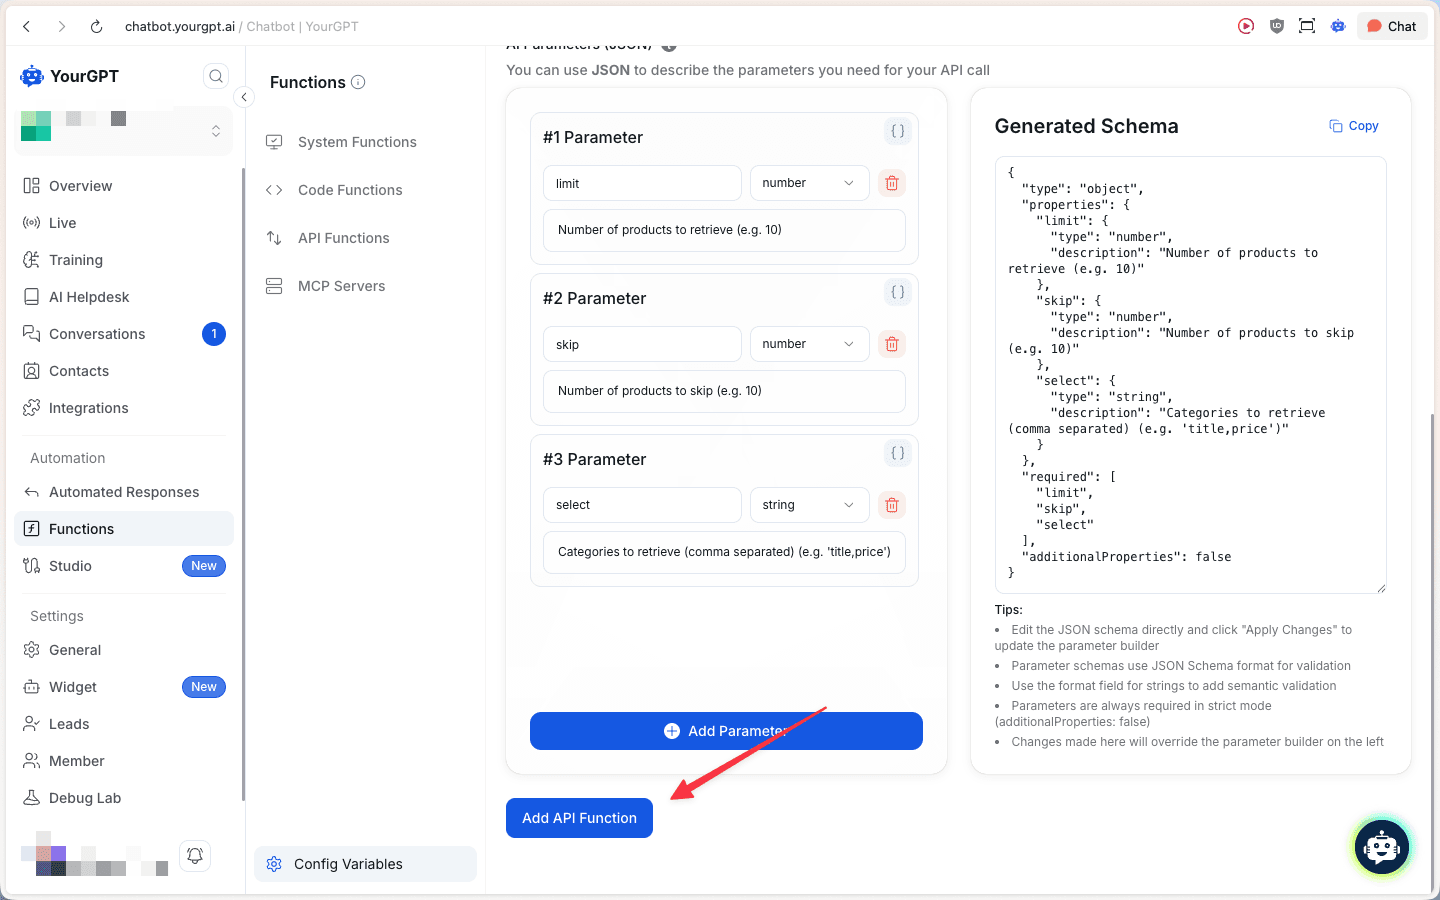
Click Add API Function to save your configuration.
Examples
Weather API
If you want to add a function that retrieves weather information based on geographic coordinates, you might set it up as follows:
- Name: Get Weather
- Description: Retrieves the current weather information based on longitude and latitude.
- API Endpoint:
GEThttps://api.weather.com/v3/wx/conditions/current?lat={{TOOL_PARAMS.latitude}}&lon={{TOOL_PARAMS.longitude}} - Headers:
Authorization: Bearer YOUR_API_KEY - AI Parameters (JSON):
{
  "type": "object",
  "properties": {
    "longitude": {
      "type": "string",
      "description": "The longitude of the location."
    },
    "latitude": {
      "type": "string",
      "description": "The latitude of the location."
    }
  },
  "required": ["longitude", "latitude"]
}
How it works:
- The AI extracts
latitudeandlongitudefrom the user's message and substitutes them into the URL via{{TOOL_PARAMS.latitude}}and{{TOOL_PARAMS.longitude}}. - Users trigger the function with a phrase like "what's the weather at latitude 35.6762, longitude 139.6503". The AI extracts the coordinates from the message and passes them to the API automatically.
Find Flight API
A function that finds the cheapest flight between two airports.
Function Setup:
- Name:
cheapest_flight_api - Description:
Find the cheapest flight from origin to destination airport - API Endpoint:
GEThttps://your_flight_api.com/cheapest?from={{TOOL_PARAMS.origin}}&to={{TOOL_PARAMS.destination}}
AI Parameters (JSON):
{
  "type": "object",
  "properties": {
    "origin": {
      "type": "string",
      "description": "The departure airport code, e.g. JFK."
    },
    "destination": {
      "type": "string",
      "description": "The arrival airport code, e.g. LHR."
    }
  },
  "required": ["origin", "destination"]
}
How it works:
- When a user says "find cheapest flights from New York to London", the AI extracts
origin(JFK) anddestination(LHR) and substitutes them into the URL via{{TOOL_PARAMS.origin}}and{{TOOL_PARAMS.destination}}. - The API returns available flights and the AI presents the results to the user.
POST Request with Body Parameters
A function that creates a new support ticket by sending user-provided data in the request body.
Function Setup:
- Name:
create_support_ticket - Description:
Create a support ticket with the user's name, issue description, and priority level - API Endpoint:
POSThttps://support.example.com/api/tickets - Headers:
Authorization: Bearer YOUR_API_KEY,Content-Type: application/json - Request Body (Raw JSON):
{
  "name": "{{TOOL_PARAMS.name}}",
  "issue": "{{TOOL_PARAMS.issue}}",
  "priority": "{{TOOL_PARAMS.priority}}"
}
AI Parameters (JSON):
{
  "type": "object",
  "properties": {
    "name": {
      "type": "string",
      "description": "The user's full name."
    },
    "issue": {
      "type": "string",
      "description": "A description of the issue the user is facing."
    },
    "priority": {
      "type": "string",
      "description": "Ticket priority: low, medium, or high."
    }
  },
  "required": ["name", "issue", "priority"]
}
How it works:
- The AI collects
name,issue, andpriorityfrom the conversation and injects them into the JSON body via{{TOOL_PARAMS.name}},{{TOOL_PARAMS.issue}}, and{{TOOL_PARAMS.priority}}. - Use
{{TOOL_PARAMS.parameter_name}}anywhere in the request body, URL, or headers.
Additional Resources
For more detailed guides and examples on setting up functions with Tool Params:
MCP Functions
Model Context Protocol (MCP) is an open standard that enables your AI agent to securely connect with tools. By using MCP servers, you can give your agent capabilities like accessing local data, google maps, keywords tools, or any other tools.
Why Use MCP?
- Standardization: Use a common protocol to connect any tool or data source.
- Security: Run servers locally or securely on your infrastructure.
- Flexibility: Connect to anything from identifying local files to complex enterprise systems.
To get started with MCP, navigate to Functions > MCP Servers and add the MCP server details to connect your first server.